In the “zero” bit theorized , this time the same practical exercises. Preparation of nested (Nested ESXi) hosts, or fully virtual, it is difficult and about the network is a lot of guides. Of course, we will prepare our hosts in the vSphere environment if you want to perform this operation in VMware Workstation, here is an interesting video showing the whole process (but do not stop reading this article ![]() .) At the beginning we need to verify whether our physical ESXi virtual hosts support. Specifically, the installed processors support Intel VT technology and EPT or AMD-V and RVI. You can check this by hand, by going to the page https://ADRES_ESXI/mob/?moid=ha-host&doPath=capability . Log into the local root user and look for the line nestedHVSupported:
.) At the beginning we need to verify whether our physical ESXi virtual hosts support. Specifically, the installed processors support Intel VT technology and EPT or AMD-V and RVI. You can check this by hand, by going to the page https://ADRES_ESXI/mob/?moid=ha-host&doPath=capability . Log into the local root user and look for the line nestedHVSupported:
If instead true we will have a false, it means so much, that in our nested ESXi will be able to run 32-bit systems only.
In the next step, prepare a virtual machine, it is best to do this from the Web client. I assume that we do it in vSphere 5.1 or earlier, so that the virtual hardware version had a level 9
The operating system we choose, as shown below.
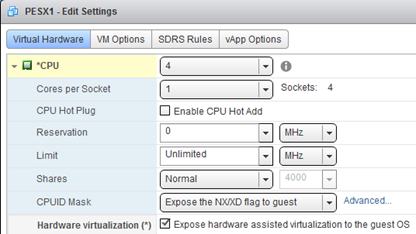
Once the machine has been created, open its properties and Virtual Hardware tab -> Cpu, select the option Hardware virtualization:
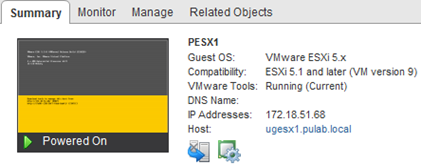
As a result, we will be able to switch the operating system on VMware ESXi 5.x (this operation can be done unfortunately only from a windows client):
At this stage, we have prepared a proper machine, now we will prepare our own installer iso image, we’ll do it because they are already available (experimental) VMware Tools for ESXi (generally recommend looking into VMware Labs )! Iso image, download the ESXi 5.5 from VMware, then take off the ESXi-Customizer program . This program is used to add to the initial installation image of all we need additional drivers (VIB). According to the instructions on the site, prepare the appropriate installation image. The installation itself is so simple that any course VMware is not about the words! ![]() Upon completion of the process, we see a nice view of how:
Upon completion of the process, we see a nice view of how:
If you do not want to play in the preparation of an iso, you can install the VIB directly from the Internet, by issuing the following command from the console of the ESXi:
esxcli system maintenanceMode set -e true
esxcli software vib install –proxy=http://172.18.60.57:8080 -v http://download3.vmware.com/software/vmw-tools/esxi_tools_for_guests/esx-tools-for-esxi-9.7.0-0.0.00000.i386.vib –f
esxcli system shutdown reboot -r “Reboocik”
Installing VMware Tools inside ESXi is a very important step in the vSphere environment, so crafted host is fully managed and monitored by vCenter. If our installation takes place inside VMware Workstation, driver installation is not required, but helpful.
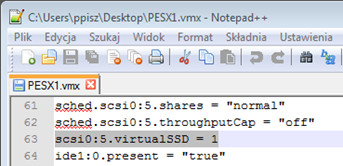
The process described above can be used to ESXi version 5.0 to 5.5. I chose and installed ESXi version 5.5, I’m going in my virtual LAB test some new technology, including VSANs . To achieve this, you must also prepare our host. 6 added to the machine drives the 8gb, four “ordinary” and two SSDs. Well, there is no such thing as a virtual disk SSD, you need to craft a vmx file accordingly, so that the disk was seen as an SSD. To achieve this, we add one line:
scsiX:Y.virtualSSD = 1
When you log on to our virtual ESXi, we see that the SSD emulation is done correctly:
Well, it’s basically enough, in the following sections VMware Lab take care of the development of our environment, starting of course from installing vCenter ![]()
Was this information is helpful? Tell me, please leave a comment!
EDIT 2015.03.20:
Very important information. In case you convert ESXi to template and generate several servers, you have a problem. All ESXi will have the same UUID (you can check by the command: “esxcli system uuid get”). To prevent this, we have to run the template and remove the last line on /etc/vmware/esx.conf (/system/uuid =). In addition, use the command “esxcli system settings advanced set -o / Net / s FollowHardwareMac 1”, this will prevent duplicate MAC addresses on the VMkernel. If you do not execute the above. steps, and we will test the vSAN a message is displayed: Host can not communicate with all other nodes in the vSAN. After doing the above steps shutdown template. Each new server gets a new UUID.


