
Often we do not have access to the specific vendor hardware. Storage are very expensive toys and do not appear, just like that, in home labs. Fortunately, companies such as EMC provide simulators. VNX simulator, for example. Of course, this product is devoid of block parts (FC) but it is a fully functional file-part (including the full management interface). Completely free. What does that give to us? Ability to check in practice as it looks professional disk array and the possibility to test several solutions. Replication between arrays (this requires a two simulators) for example. And of course, satisfy curiosity as always.

Did you know? You can access your files, media remotely from anywhere with cloud based solutions by CloudDesktopOnline.com. Switch to Virtual PCs with top-notch support from Apps4Rent.com.
In this post I will show you how to install and configure the EMC VNX for File (in the next post will be about installing EMC Isilon and ViPR). The simulator is available for free (with a licenses to support NFS, CIFS, Snapshot, File Replicator and Retention) on EMC pages, or can be downloaded directly from me. Import machine to vSphere (or VMware Workstation / Player) is a standard process:

VNX version is 8.1 which is for the moment the newest:

We can also download version 7.1.6 (the version that is installed in VNX5300 arrays) with one controller (less demanding). The machine has two interfaces and needs two IP addresses, if you have your own DNS server, preferably immediately create appropriate records A / PTR (to facilitate us swapping SSL certificates). Obviously this is not a step required for proper operation. These two addresses is for management, you will also need at least one IP address for running services.
![]()
When you start the machine, log in to it as root/nasadmin via console:

And configure the network by typing “netconfig -d eth0” (and eth1):

When configuring interfaces is end, issue the command ifup eth0 (and eth1). In the file /etc/sysconfig/network We can disable ipv6:

At this stage we can log off (wait a few minutes) and go to the management interface. Connect via web browser to the address of the first interface (in my case: http://vnx1a.piszki.pl), if everything is ok, we see this:

We run Unisphere and review the configuration (username and password is root / nasadmin). Unisphere needs Java and security settings to medium (Control Panel -> Java). To use our simulator, we have to activate all (or selected) licenses, we do it in the “Settings -> Manage Licenses”:

The simulator in this form is ready and you can play with it. If we want to use it for more serious tests (remember, performance will not be the biggest) we need to make three more steps. In the first step we stop array and add its 2GB of RAM (in order to have a minimum of 6GB RAM), without this, secondary controller (data_mover3) will be inoperate (message “slot_empty”). In the second step, we move one of two controllers (data_movers) for the second, configured by us earlier, network interface (/opt/blackbird/tools) via command configure_nic:

And the last step, restart storage by “reboot” command. After the restart we can verify the new configuration:


The storage is configured with two pools tagged as economy (about 20GB) and performance (about 90GB) which should be sufficient for testing completely. I personally installed the two VNX simulators, do I need to test EMC VIPR which I will write in another post. Holders of its own CA who want to replace the SSL certificates which shows the Control Station (Unisphere) may look here. Prepare the appropriate DataStore can be done in two ways. The first method, traditional, boring and passe: we’re create on the array side and connect it to the ESXi traditionally. As it is the first of my posts about EMC products, I describe here the other way. In this way, in a software defined storage world, we use EMC VSI for vSphere. It is a plugin for vCenter Web Client installed as a virtual appliance and providing integrated support for EMC product (available for free). Installation is very simple (deploy ova), after installing, configuring and starting the appliance, log in to the administrative interface and integrate VSI with our vCenter (https: //IP_appliance:8443/vsi_usm/admin Username: admin / ChangeMe):

In the next step, go to the vSphere Web Client and in the “vCenter-> EMC VSI-> Solutions Integration Services” connect your VSI:

As you can see, in return will use the same login used in connecting vCenter to VSI, you need Administrator privileges to the vCenter for this login. The effect of integration:

Now in the Storage Systems add your virtual VNX array:

The integration proceeds without problem:

And finally we can create our new datastore for the virtual VNX arrays from the menu available by clicking on the level of a cluster or a single server:

Parameters of the sample datastore:

This method of creating datastores is much more efficient and faster than the traditional model. VNX for File work very well, I highly recommend testing them. Installation instructions can also be downloaded from here, it is also written on how to extend disk space. If there are any questions I will be glad to answer them.
EDIT 2015.03.16 @Sly:
Boring and old-fashioned method looks like this:
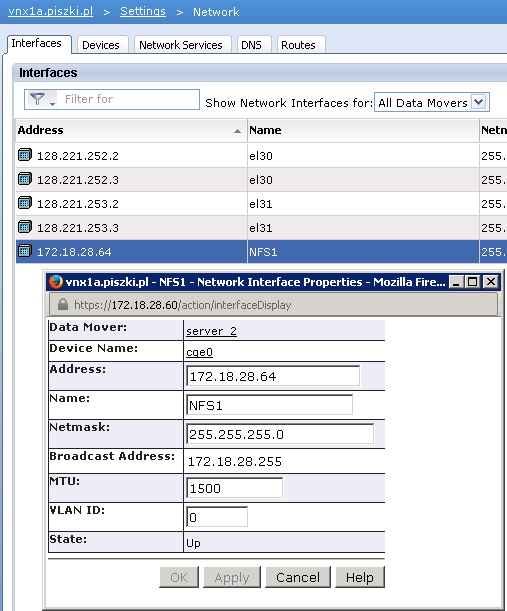
1. Create a new network interface, address given above are intended only to manage VNX. This interface is mandatory to serve CIFS/NFS:
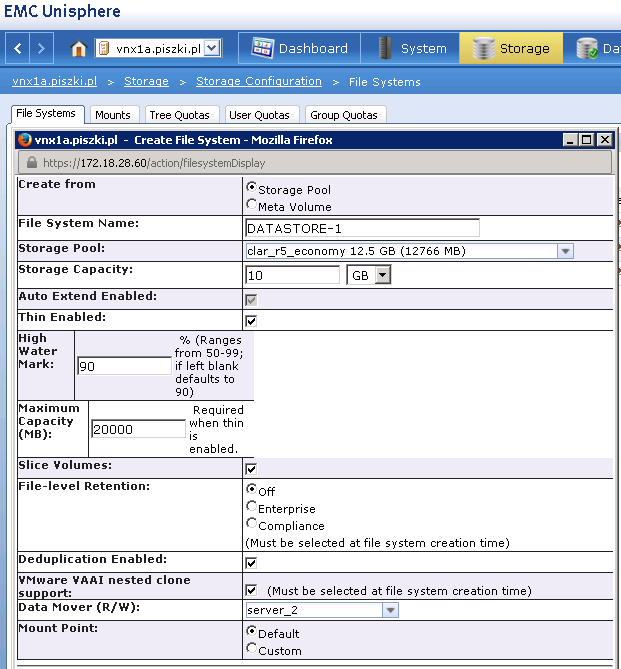
2. Create a new filesystem:
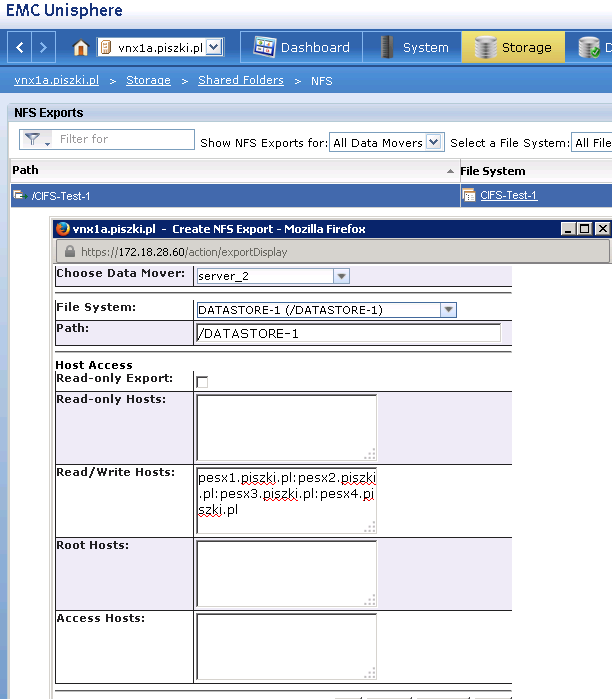
3. Create NFS export:
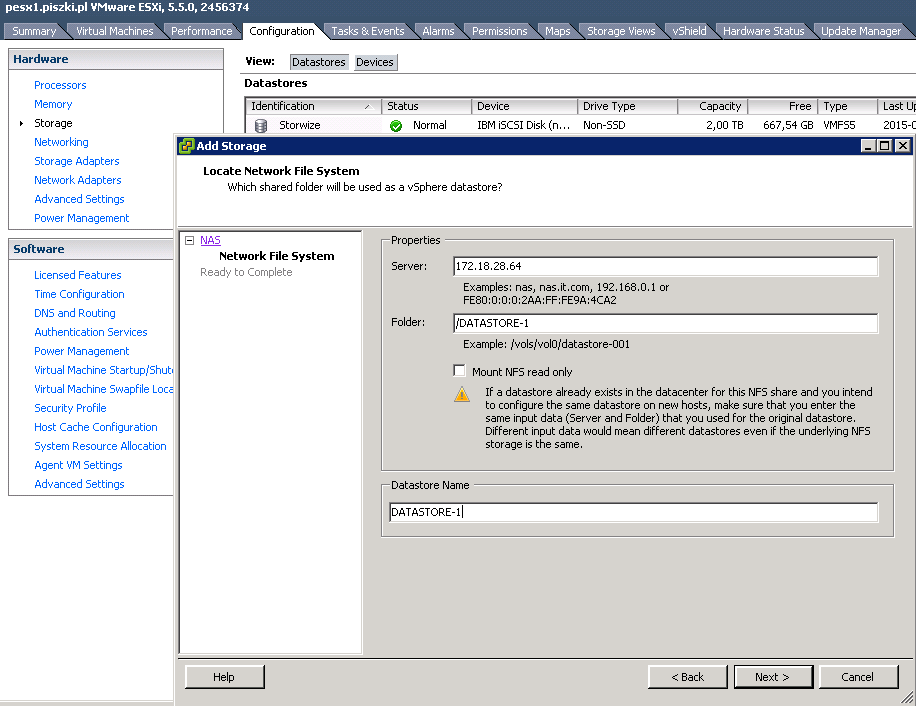
4. Mount new datastore:
5. Enjoy :-)

24 Comments
Leave a reply →