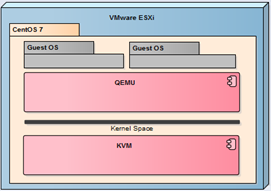
Last check very intesively all type of Cloud solutions available on Open Source license (such as Proxmox, oVirt and CloudStack). All they mainly use a free hypervisor that is KVM. Of course, there is no question about that every now and then to put the physical machine with KVM since all have virtualized with VMware vSphere. In this article I will show how to prepare a nested KVM server (based on CentOS 7) and working under the control of VMware ESXi (similar configuration will work with VMware Workstation).
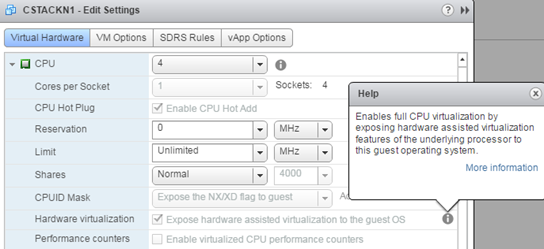
Nesting virtualization of ESXi thoroughly discussed here and here and here. In the case of KVM we have exactly the same requirements. Physical server must support nested virtualization and the virtual KVM machine settings have to enable “Hardware wirtualization.”
In addition, the network in which operates nested KVM should be switched to Promiscuous Mode. As already mentioned, KVM server is a standard CentOS 7 installed as a minimal install. In such a system, we have crafted a few steps to run a fully functional QEMU/KVM server. Start by install the appropriate packages.
yum install kvm libvirt virt-install virt-manager qemu-kvm libvirt-client virt-viewer bridge-utils qemu-img libvirt-python xauth
Of course, virt-manager package is not necessary, it will allow us a simple way to check if everything is ok. After installing the packages we need to configure the package QEMU and libvirt. We start from the file /etc/libvirt/qemu.conf where delete # in line: vnc_listen = 0.0.0.0
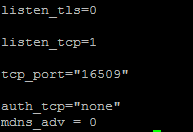
Then in the file /etc/libvirt/libvirtd.conf add the following parameters (or remove # from the relevant lines):
Next, in the file /etc/sysconfig/libvirtd delete # on line: LIBVIRT_ARGS = “– listen”
Then we proceed to the network configuration inside the machine. KVM functions as a router, virtual machines inside KVM communicate with the outside world using a standard, bridging network using NAT (in this example we will not use Open vSwitch). For Linux to function as a router, it must allow forwarding packets (IP forwarding). Create a file /etc/sysctl.d/99-ipforward.conf with the contents: net.ipv4.ip_forward = 1.
This setting can be enabled by the command sysctl –p (or restart the machine, the setting is permanent). In the next step, completely reconfigure the network, we do it from the console of the machine (at one point we cut off network for a moment) with the following commands:
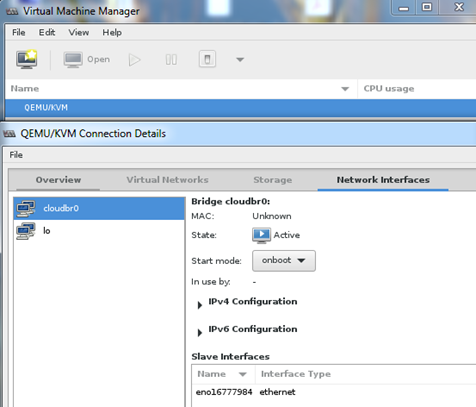
As you can see, we create a bridge to which move the IP address, from now all communication will go through a cloudbr0. This command (nmcli) is of course Natwork Manager CLI, we can do the same using interfaces files in /etc/sysconfig/network-scripts. Thus prepared, we can restart the server to ensure that all changes are active. Test can be performed using virt-manager, so you need Xming on Windows Workstation. In the main window, click “Details” on QEMU/KVM.
QEMU/KVM is working properly, the bridge is visible and connected. From this point you can create virtual machines (manually), or connect the server into CloudStack and go to the next level of virtualization.


2 Comments
Leave a reply →