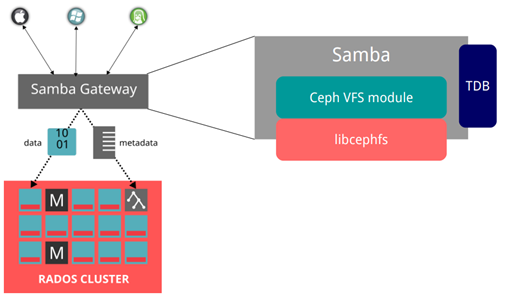
The purpose of today’s exercise will be to run a secure, full HA, Samba cluster with which we will serve files directly from CephFS and authorize users at the OpenLDAP level. The closest equivalent to this configuration is the Failover Cluster + DFS service available in Microsoft Windows Server 2012+. Ceph and OpenLDAP configuration can be found in the linked articles, here we will focus mainly on CTDB and Samba. Clustered Trivial Data Base, because this is how this abbreviation develops, ensures the consistency of user sessions between multiple nodes. He also oversees the work of samba itself. In this configuration the VFS module samba-vfs-ceph (Samba Gateway for CephFS) will be used, this module allows samba to work correctly (natively) with CephFS. Using this module, Samba dumps all file operations (opening, blocking, closing, etc.) on CephFS. To ensure consistency with recent configurations, users will be taken from OpenLDAP (the entire Samba configuration will also be stored there). Thanks to this approach, we will obtain a coherent, redundant configuration that will seamlessly connect many components. Due to the use of the latest versions, which are not available in CentOS 7 or Ubuntu 18, all configuration will be carried out on Fedora Server 29 (but I think we will put it on CentOS 8 without any problems).
Preparing Fedora 29 (CentOS 8):
yum install mc wget curl numactl git tuned mailx yum-utils deltarpm nano bash-completion net-tools bind-utils lsof screen bmon ntp rsync nmap socat ntpdate dconf authconfig nss-pam-ldapd pam_krb5 krb5-workstation openldap-clients cyrus-sasl-gssapi langpacks-pl oddjob-mkhomedir openldap-clients samba-vfs-cephfs ctdb samba-winbind-clients smbldap-tools ceph-common samba-client
We will use two Samba nodes, the whole will connect to the HDC1 and HDC2 servers described in the previous article. Servers received the names:
smb1.hdfs.lab – 192.168.30.51
smb2.hdfs.lab – 192.168.30.51
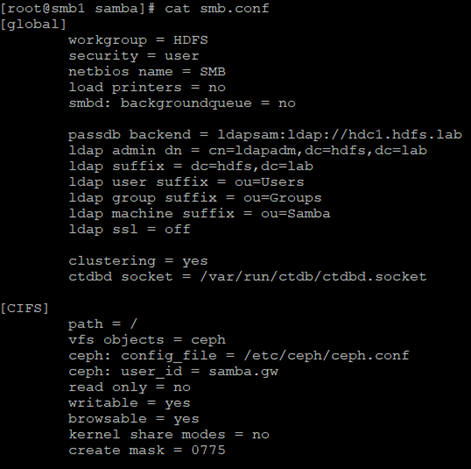
And additionally, for the needs of the cluster, one public address was prepared smb.hdfs.lab – 192.168.30.50 through which Samba resources will be made available. Each of the servers (in my case virtual machines) has two network interfaces, the first one plays the role of MGMT and the second one PUBLIC. The SMB server system must be fully integrated with OpenLDAP as shown in this article (the LDAP user is both POSIX and SAMBA). The OpenLDAP server must have an additional SAMBA schema uploaded, the file /usr/share/doc/samba/LDAP/samba.ldif (available on Fedora 29) to be loaded (from the LDAP server) with this command: ldapadd -Y EXTERNAL -H ldapi command: /// -f samba.ldif. The configuration files must be the same on both nodes, additionally a CephFS share must be mounted which will provide support for the CTDB lock file (here: /data/ctdb/lock/ctdb.lck). So we not only use CephFS as a shared network share (CIFS), but also as a cluster resource for the CTDB lock file (having such a clustered share is required for proper CTDB work). As you can see, the whole environment is closely integrated. On both cluster nodes we configure the samba in the same way, the file sbm.conf:
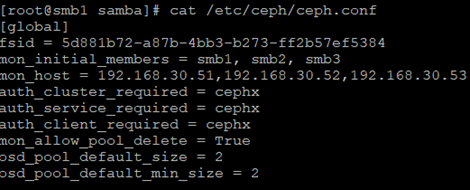
As you can see, the permissions are kept in OpenLDAP, this is a fairly simplified configuration, it only requires the user to be authorized in OpenLDAP and he will automatically obtain read and write permissions. Samba goes straight to the ceph.conf file containing information about where the Ceph monitors are, directly is also given to the user who Samba connects to Ceph (samba.gw). In my case, the Ceph cluster is completely different machines than those supporting Samba.
The user and password are generated by a command: ceph auth get-or-create client.samba.gw mon ‘allow r’ osd ‘allow *’ mds ‘allow *’ -o ceph.client.samba.gw.keyring
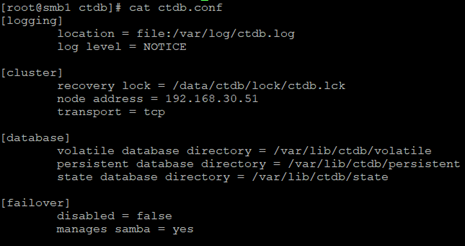
Let’s move to CTDB, this service works on a very similar principle as KeepaliveD, uses the VRRP protocol to check if a given node is alive and responding. On each node, the configuration differs only by the node’s IP address. /etc/ctdb/ctdb.conf file:
In the /etc/ctdb/nodes file we store the cluster nodes IP and in the /etc/ctdb/public_addresses file we provide one or many public addresses and the interface on which the service will listen.
The whole cluster can be configured so that we will have many public IPs, and each of them can listen on a different node, the whole can be, e.g. configured in one DNS record acting as a round robin, which will increase the availability of the share. In my case, we have two nodes and one public IP, typical failover. It should be remembered that the whole thing is controlled by the CTDB service, it starts and stops Samba. How it’s working? In this configuration, Samba acts as a typical proxy, authorizes the user and directs all disk operations to CephFS. This means that the transfer we achieve is equal to the performance of the public network supporting Ceph, and the network card in the machine supporting CTDB. In our configuration, we can apply some modification, we have a locally mounted CephFS resource, we can also export it from this level.
Adding such a piece to the smb.conf configuration will cause us to export a standard local share (with permissions as above). The difference in operation is that all disk operations are taken on by ceph-client, and we are also dealing with local disk buffers in RAM. On the one hand, it is faster, RAM is used as a write cache, on the other a little less secure, if the machine crashes with data in the cache, we will have data loss. In summary, the configuration described above allows, in a completely native and integrated way, to place a CephFS resource as a CIFS share in a safe and highly available way.


