
Today we will deal with LDAP kerberization, it sounds a bit strange, but it comes down to installing and configuring a cluster consisting of multiple nodes (N +) operating in active mode. This cluster will serve LDAP and Kerberos services for Linux systems. The kerberosa database will be stored in OpenLDAP, thanks to this service, kerberos will also work as multi master. In addition to the cluster itself, we will also configure the client system to authenticate the user at the LDAP level and that the user can use the kerberos ticket to move freely between the systems. This exercise aims to prepare an authorization system for use in the subsequent installation of Hadoop.

Although there is no limit to the number of nodes, I will use only two of them that work in full replication. As part of the preparation, you must have a DNS server and have a consistent time in the whole environment (NTP). As the operating system I chose CentOS 7, but for the cluster’s configuration it does not matter, it could be Ubuntu 18. For this installation I generated a new hdfs.lab domain and two HDC1 and HDC2 servers with IP 192.168.30.11,12. The new domain comes from the fact that Active Directory is also Kerberos, and there can not be two centers serving the same domain on the network (for me: piszki.lab). We start by installing all the necessary packages (on both nodes):
yum install krb5-server krb5-server-ldap krb5-workstation pam_krb5 openldap compat-openldap openldap-clients openldap-servers openldap-servers-sql openldap-devel nss-pam-ldapd cyrus-sasl-gssapi
There will be several additional packages for this purpose to meet dependencies. We will of course start by configuring OpenLDAP in multimaster mode, I suggest to prepare a directory named /root/ldap in which we will create a series of ldif files. We will only put OpenLDAP in a TLS secured version (and general access and replication), so you need a certificate at startup. I generated one certificate with SAN names for both servers (certificates will be even further). As an attachment to this article you will find my camenu script with the help of which you can create your own CA and generate any certificate. From this moment, we create the configuration at both nodes simultaneously, when we enable replication, further configuration will take place only on the first node.
File content /etc/sysconfig/slapd :
SLAPD_URLS=”ldapi:/// ldap:/// ldaps:///”
SLAPD_LDAPS=yes
We add a line to the /etc/rsyslog.conf file:
local4.* /var/log/openldap/ldap.log
The contents of the /etc/logrotate.d/openldap file
/var/log/openldap/ldap.log {
daily
rotate 10
missingok
notifempty
sharedscripts
postrotate
/bin/kill -HUP `cat /var/run/rsyslogd.pid 2> /dev/null` 2> /dev/null || true
endscript
}
We copy the file:
cp /usr/share/openldap-servers/DB_CONFIG.example /var/lib/ldap/DB_CONFIG
chown ldap:ldap /var/lib/ldap/DB_CONFIG
The contents of the /etc/openldap/ldap.conf file:
BASE dc=hdfs,dc=lab
URI ldap://hdc1.hdfs.lab ldaps://hdc1.hdfs.lab #(i odpowiednio dla hdc2.hdfs.lab)
TLS_CACERTDIR /etc/openldap/certs
TLS_CACERT /etc/openldap/certs/ca.crt
TLS_REQCERT allow
SASL_NOCANON on
We restart the rsyslog service, start the slapd service (on /var/log/openldap, the ldap.log file should appear). Certificates are copied to /etc/openldap/certs (in my case they are dc.crt, dc.key and ca.crt). We are ready, we can continue working (slapd will be listening on ports 88 and 636, configure firewalld accordingly).
We create the first LDIF file (we load the synchronization module):
[root@hdc1 ldap]# cat 01_syncprov.ldif
dn: cn=module,cn=config
objectClass: olcModuleList
cn: module
olcModulePath: /usr/lib64/openldap
olcModuleLoad: syncprov.la
We create a second LDIF file (olcServerID is different on every server!):
[root@hdc1 ldap]# cat 02_config.ldif
dn: cn=config
changetype: modify
add: olcServerID
olcServerID: 1
We generate a password with the slappasswd command and upload it to the third LDIF file:

[root@hdc1 ldap]# cat 03_rootpw.ldif
dn: olcDatabase={0}config,cn=config
add: olcRootPW
olcRootPW: {SSHA}AyqlgqpsP6ITRWdZlqDBMWj/rP/Xy20W
We create the fourth LDIF file (we replace the existing certificates with our own, note: the key file (dc.key) must have the “ldap” group property and the 640 privilege):
[root@hdc1 ldap]# cat 04_ssl.ldif
dn: cn=config
changetype: modify
replace: olcTLSCertificateKeyFile
olcTLSCertificateKeyFile: /etc/openldap/certs/dc.key
–
replace: olcTLSCertificateFile
olcTLSCertificateFile: /etc/openldap/certs/dc.crt
–
replace: olcTLSCACertificateFile
olcTLSCACertificateFile: /etc/openldap/certs/ca.crt
–
replace: olcTLSCipherSuite
olcTLSCipherSuite: TLSv1+RSA:!EXPORT:!NULL
–
replace: olcTLSVerifyClient
olcTLSVerifyClient: never
We create the fifth LDIF file (configuration of replication between nodes, password XXXXX is of course those that you have generated above with the slappasswd command):
[root@hdc1 ldap]# cat 05_configrep.ldif
dn: cn=config
changetype: modify
replace: olcServerID
olcServerID: 1 ldaps://hdc1.hdfs.lab
olcServerID: 2 ldaps://hdc2.hdfs.lab
dn: olcOverlay=syncprov,olcDatabase={0}config,cn=config
changetype: add
objectClass: olcOverlayConfig
objectClass: olcSyncProvConfig
olcOverlay: syncprov
dn: olcDatabase={0}config,cn=config
changetype: modify
add: olcSyncRepl
olcSyncRepl: rid=001 provider=ldaps://hdc1.hdfs.lab binddn=”cn=config”
bindmethod=simple credentials=”XXXXX” searchbase=”cn=config”
type=refreshAndPersist retry=”5 5 300 5″ timeout=1
olcSyncRepl: rid=002 provider=ldaps://hdc2.hdfs.lab binddn=”cn=config”
bindmethod=simple credentials=”XXXXX” searchbase=”cn=config”
type=refreshAndPersist retry=”5 5 300 5″ timeout=1
–
add: olcMirrorMode
olcMirrorMode: TRUE
Next, we upload the files on both servers one after the other, resulting in an OpenLDAP cluster replicating data between each other.

In the log we will see the correct connections between servers (data is not yet replicated, only configuration).

From this moment, all steps are performed on one node (!!!), the settings will be replicated.
We create the sixth LDIF file (the replication database reference, I use {2} hdb):
[root@hdc1 ldap]# cat 06_syncdb.ldif
dn: olcOverlay=syncprov,olcDatabase={2}hdb,cn=config
changetype: add
objectClass: olcOverlayConfig
objectClass: olcSyncProvConfig
olcOverlay: syncprov
We create the seventh LDIF file (the olcRootPW and credentials password is the same as in files 03 and 05):
[root@hdc1 ldap]# cat 07_ldapdomain.ldif
dn: olcDatabase={2}hdb,cn=config
changetype: modify
replace: olcSuffix
olcSuffix: dc=hdfs,dc=lab
–
replace: olcRootDN
olcRootDN: cn=ldapadm,dc=hdfs,dc=lab
–
replace: olcRootPW
olcRootPW: {SSHA}AyqlgqpsP6ITRWdZlqDBMWj/rP/Xy20W
–
add: olcSyncRepl
olcSyncRepl: rid=004 provider=ldaps://hdc1.hdfs.lab binddn=”cn=ldapadm,dc=hdfs,dc=lab” bindmethod=simple
credentials=”XXXXX” searchbase=”dc=hdfs,dc=lab” type=refreshOnly
interval=00:00:00:10 retry=”5 5 300 5″ timeout=1
olcSyncRepl: rid=005 provider=ldaps://hdc2.hdfs.lab binddn=”cn=ldapadm,dc=hdfs,dc=lab” bindmethod=simple
credentials=”XXXXX” searchbase=”dc=hdfs,dc=lab” type=refreshOnly
interval=00:00:00:10 retry=”5 5 300 5″ timeout=1
–
add: olcDbIndex
olcDbIndex: entryUUID eq
–
add: olcDbIndex
olcDbIndex: entryCSN eq
–
add: olcMirrorMode
olcMirrorMode: TRUE
In the next step, we load both files, from that moment we have enabled replication of the OpenLDAP database (it will be clearly visible in the log, where cyclic entries from replication will appear).

We see that replication goes encrypted channel (TLS).

The basic configuration of the OpenLDAP cluster behind us, now we will configure the domain and everything that we need.
We create the eighth LDIF file (limitation of replication to the ldapadm account):
[root@hdc1 ldap]# cat 08_monitor.ldif
dn: olcDatabase={1}monitor,cn=config
changetype: modify
replace: olcAccess
olcAccess: {0}to * by dn.base=”gidNumber=0+uidNumber=0,cn=peercred,cn=external, cn=auth” read by dn.base=”cn=ldapadm,dc=hdfs,dc=lab” read by * none
In the next step we will install the basic schematics for OpenLDAP (parameter definitions):
ldapadd –Y EXTERNAL –H ldapi:/// –f /etc/openldap/schema/cosine.ldif (nis, inetorgperson, java, misc)

We create the ninth LDIF file (directory contents, administrator and groups, the content can be any):
[root@hdc1 ldap]# cat 09_base.ldif
dn: dc=hdfs,dc=lab
dc: hdfs
objectClass: top
objectClass: domain
dn: cn=ldapadm,dc=hdfs,dc=lab
objectClass: organizationalRole
cn: ldapadm
description: LDAP Manager
dn: ou=Users,dc=hdfs,dc=lab
objectClass: organizationalUnit
ou: Users
dn: ou=Groups,dc=hdfs,dc=lab
objectClass: organizationalUnit
ou: Groups
dn: ou=Services,dc=hdfs,dc=lab
objectClass: organizationalUnit
ou: Groups
We create the tenth file (this is the memberOf definition, this parameter is often required when searching the directory by external services):
[root@hdc1 ldap]# cat 10_memberof.ldif
dn: cn=module,cn=config
cn: module
objectclass: olcModuleList
objectclass: top
olcmoduleload: memberof.la
olcmodulepath: /usr/lib64/openldap
dn: olcOverlay={0}memberof,olcDatabase={2}hdb,cn=config
objectClass: olcConfig
objectClass: olcMemberOf
objectClass: olcOverlayConfig
objectClass: top
olcOverlay: memberof
dn: cn=module,cn=config
cn: module
objectclass: olcModuleList
objectclass: top
olcmoduleload: refint.la
olcmodulepath: /usr/lib64/openldap
dn: olcOverlay={1}refint,olcDatabase={2}hdb,cn=config
objectClass: olcConfig
objectClass: olcOverlayConfig
objectClass: olcRefintConfig
objectClass: top
olcOverlay: {1}refint
olcRefintAttribute: memberof member manager owner
We upload this file with the command ldapadd –x –w ‘XXXXX’ –D “cn=ldapadm,dc=hdfs,dc=lab” –f 09_base.ldif (with password).

From that moment we have a functional OpenLDAP cluster with full data synchronization. In the next steps we will go to the Kerberos configuration.
This simple bash script will generate the eleventh LDIF file in the /root/ldap directory:
cp /usr/share/doc/krb5-server-ldap-1.15.1/kerberos.schema /etc/openldap/schema
mkdir /tmp/ldap-kerberos/
echo “include /etc/openldap/schema/kerberos.schema” > /tmp/ldap-kerberos/schema_convert.conf
mkdir /tmp/ldap-kerberos/krb5_ldif
slaptest -f /tmp/ldap-kerberos/schema_convert.conf -F /tmp/ldap-kerberos/krb5_ldif
cp /tmp/ldap-kerberos/krb5_ldif/cn=config/cn=schema/cn\=\{0\}kerberos.ldif /root/ldap/11_kerberos.ldif
FILE=/root/ldap/11_kerberos.ldif
sed -i “s@dn: cn={0}kerberos.*@dn: cn=kerberos,cn=schema,cn=config@g” ${FILE}
sed -i “s@cn: {0}kerberos.*@cn: kerberos@g” ${FILE}
sed -i ‘/structuralObjectClass: /d’ ${FILE}
sed -i ‘/creatorsName: cn=config/d’ ${FILE}
sed -i ‘/modifiersName: cn=config/d’ ${FILE}
sed -i ‘/createTimestamp: /d’ ${FILE}
sed -i ‘/modifyTimestamp: /d’ ${FILE}
sed -i ‘/entryUUID: /d’ ${FILE}
sed -i ‘/entryCSN: /d’ ${FILE}

Finally, we create the twelfth LDIF file (containing index definitions):
[root@hdc1 ldap]# cat 12_index.ldif
dn: olcDatabase={2}hdb,cn=config
changetype: modify
add: olcDbIndex
olcDbIndex: uid eq
–
add: olcDbIndex
olcDbIndex: member eq
–
add: olcDbIndex
olcDbIndex: dc eq
–
add: olcDbIndex
olcDbIndex: uidNumber eq
–
add: olcDbIndex
olcDbIndex: gidNumber eq
–
add: olcDbIndex
olcDbIndex: memberUid eq
–
add: olcDbIndex
olcDbIndex: uniqueMember eq
–
add: olcDbIndex
olcDbIndex: krbPrincipalName eq,pres,sub
–
add: olcDbIndex
olcDbIndex: krbPwdPolicyReference eq
Upload: ldapmodify -Y EXTERNAL -H ldapi:/// -f 12_index.ldif
The contents of the file /etc/krb5.conf (definition of our domain):
includedir /etc/krb5.conf.d/
[logging]
default = FILE:/var/log/kerberos/krb5libs.log
kdc = FILE:/var/log/kerberos/krb5kdc.log
admin_server = FILE:/var/log/kerberos/kadmind.log
[libdefaults]
dns_lookup_realm = false
ticket_lifetime = 24h
renew_lifetime = 7d
forwardable = true
rdns = false
proxiable = true
pkinit_anchors = /etc/openldap/certs/ca.crt
udp_preference_limit = 1
default_realm = HDFS.LAB
default_ccache_name = KEYRING:persistent:%{uid}
[realms]
HDFS.LAB = {
admin_server = hdc1.hdfs.lab
kdc = hdc1.hdfs.lab
kdc = hdc2.hdfs.lab
database_module = openldap_ldapconf
}
[dbdefaults]
ldap_kerberos_container_dn = cn=Kerberos,dc=hdfs,dc=lab
[appdefaults]
pam = {
debug = false
ticket_lifetime = 3600
renew_lifetime = 3600
forwardable = true
krb4_convert = false
}
[dbmodules]
openldap_ldapconf = {
db_library = kldap
ldap_kdc_dn = “cn=ldapadm,dc=hdfs,dc=lab”
ldap_kadmind_dn = “cn=ldapadm,dc=hdfs,dc=lab”
ldap_service_password_file = /var/kerberos/krb5kdc/service.keyfile
ldap_servers = ldaps://hdc1.hdfs.lab ldaps://hdc2.hdfs.lab
ldap_conns_per_server = 5
}
[domain_realm]
.hdfs.lab = HDFS.LAB
hdfs.lab = HDFS.LAB
Content of file /var/kerberos/krb5kdc/kdc.conf :
[kdcdefaults]
kdc_ports = 88
kdc_tcp_ports = 88
[realms]
HDFS.LAB = {
max_life = 12h 0m 0s
max_renewable_life = 7d 0h 0m 0s
master_key_type = aes256-cts
acl_file = /var/kerberos/krb5kdc/kadm5.acl
dict_file = /usr/share/dict/words
admin_keytab = /var/kerberos/krb5kdc/kadm5.keytab
supported_enctypes = aes256-cts:normal aes128-cts:normal des3-hmac-sha1:normal arcfour-hmac:normal camellia256-cts:normal camellia128-cts:normal des-hmac-sha1:normal des-cbc-md5:normal des-cbc-crc:normal
}
Contents of the /var/kerberos/krb5kdc/kadm5.acl file:
*/admin@HDFS.LAB *
We generate a file with a password for ldapadm which kerberos will connect to OpenLDAP, we do the same on both servers.
kdb5_ldap_util -D cn=ldapadm,dc=hdfs,dc=lab stashsrvpw -f /var/kerberos/krb5kdc/service.keyfile cn=ldapadm,dc=hdfs,dc=lab
We generate the kerberos structure in ldap (we only do it on one server):
kdb5_ldap_util -D “cn=ldapadm,dc=hdfs,dc=lab” -H ldap://hdc1.hdfs.lab create -subtrees “cn=Kerberos,dc=hdfs,dc=lab” -r HDFS.LAB -s

We give the password for the kerberos base and … we have it! It remains to copy the master key with the password to the kerberos base to the second node:

In the next step, we start krb5kdc (on both servers) and kadmin on the first. We have reached the stage where we can perform the “client” configuration. In my case it will be CentOS 7, the configuration of the client who is the server is slightly different from the “regular” client, I will try to distinguish it. However, we will start by testing the kerberosa, we must add the appropriate permissions:
kadmin.local -q “addprinc admin/admin”
kadmin.local -q “addprinc root/admin”
And for the root user:

Next, we add permissions for hosts in the cluster (as host and as ldap):

We write host permissions to the file /etc/krb5.keytab (the file is also copied to the second node, the owner of the file should be the user “ldap”):

We create the file /var/kerberos/krb5kdc/kadm5.keytab (we copy it to the second node):

At this stage, we have openLDAP and Kerberos, we will now perform kdberisation of ldap, i.e. configure the system to log in with the ldap account, generate kerberos permissions and use them with ssh. We are doing this for now on the nodes of the cluster, at the end I will show the procedure of connecting the client server to the entire system (it will be much simpler). For managing OpenLDAP I recommend LDAP Admin client, simple and effective. In my directory I will create a ppisz user whom I will use for further tests (we give him permission in the domain: kadmin.local -q “addprinc ppisz”).
We enable log in of the OpenLDAP account:
authconfig –updateall –enableldap –enableldapauth –enablemkhomedir
The ldap authentication is provided by the NSCD service:
[root@HDC2 ~]# cat /etc/nslcd.conf
uid nslcd
gid ldap
uri ldaps://hdc1.hdfs.lab ldaps://hdc2.hdfs.lab
base dc=hdfs,dc=lab
bind_timelimit 30
timelimit 30
idle_timelimit 3600
ssl on
tls_reqcert demand
tls_cacertdir /etc/openldap/cacerts
tls_cacertfile /etc/openldap/cacerts/ca.crt # To jest ten sam plik co w /etc/openldap/certs/ca.crt
tls_ciphers HIGH:TLSv1.2:!aNULL:!eNULL
We restart the nscd service and can log in with the OpenLDAP account and generate kerberos permissions:

To bind everything together, we still have to configure the combination of kerberosa and ldap with GSSAPI.
We create the thirteenth LDIF file:
[root@hdc1 ldap]# cat 13_sasl.ldif
dn: cn=config
changetype: modify
add: olcAuthzRegexp
olcAuthzRegexp: uid=([^,]+),cn=hdfs.lab,cn=gssapi,cn=auth
uid=$1,ou=Users,dc=hdfs,dc=lab
–
add: olcSaslSecProps
olcSaslSecProps: noanonymous,noplain
–
add: olcSaslRealm
olcSaslRealm: HDFS.LAB
Upload: ldapmodify -QY EXTERNAL -H ldapi:/// -f 13_sasl.ldif
We complement the /etc/openldap/ldap.conf file with the GSSAPI directive:
[root@hdc1 ~]# cat /etc/openldap/ldap.conf
BASE dc=hdfs,dc=lab
URI ldaps://hdc1.hdfs.lab ldaps://hdc2.hdfs.lab
TLS_CACERTDIR /etc/openldap/cacerts
TLS_CACERT /etc/openldap/cacerts/ca.crt
TLS_REQCERT allow
SASL_NOCANON on
SASL_MECH GSSAPI
SASL_REALM HDFS.LAB
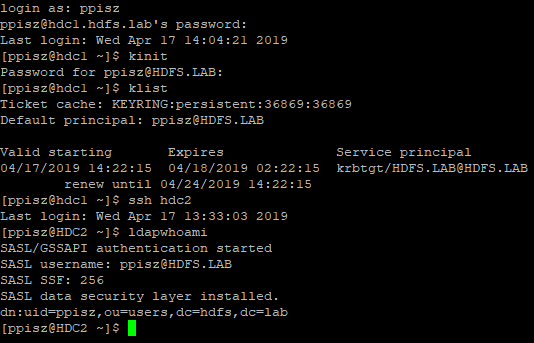
As you can see in both cases, both OpenLDAP servers are indicated as URIs. If it works, the first server will always be asked, and that’s ok, the Kerberos tickets are stored per cluster node (even though the base is shared), so it’s better to be in one place (otherwise you will have to generate a new ticket). When it comes to configuring SSH in CentOS 7, you do not have to do anything, so the configured system will allow you to complete the sequence:
And that’s actually the end, it’s the preparation of a client that is not a server, in which case we install the following packages:
yum install nss-pam-ldapd pam_krb5 krb5-workstation openldap-clients cyrus-sasl-gssapi
Copy (from the cluster node) files /etc/openldap/ldap.conf /etc/krb5.conf /etc/nslcd.conf to client and ca.crt to /etc/openldap/certs and cacerts
And finally TIP:
Such a message: bdb_equality_candidates: (uid) not indexed indicates that no index on databse (the parameter will be in brackets).
To create an index, create an LDIF file (standard upload, ldapmodify):
dn: olcDatabase={2}hdb,cn=config
add: olcDbIndex
olcDbIndex: uid eq
And that would be enough, the post came out very long, but it exhausts the topic as much as it could, if someone has more experience in the topic and would like to suggest something, I encourage you to comment.
3 Comments
Leave a reply →